HU60
• Spotlight/Floodlight Adjustable
• Wireless Control Available
• Penta LED Design
USB Powered
Elite Headlamp
(English) HU60 (Español) HU60 (Deutsch) HU60
(Francais)
HU60
Features
Specications
Accessories
Technical Data
Connecting a Power Source
Remote Control
• Spotlight/Floodlight Adjustable Dual Output USB Powered Headlamp
• The spotlight utilizes 4 x CREE XP-G3 S3 LEDs with a max output of 1,600 lumens,
a max peak beam intensity of 6,570cd and a max throw of 162 meters
• TheoodlightutilizesaCREEXHP35HDE2LEDwithawiderangeopticsystemof
170° illumination angle
• 5brightnesslevelsavailablewithadjustablespotlight/oodlightoutputratio
(Patent No. ZL201820778007.X; US Patent No.: 16/377,534 US10,677,434 B2)
• Wristband remote included for wireless control (Patent No. ZL201520717872.X)
• 100°tiltanglefordierentilluminationneeds
• Highlyecientconstantcurrentcircuitprovidesastableoutput
• Convenient USB-A plug compatible with universal USB power sources
• Incorporated Advanced Temperature Regulation (ATR) module
(Patent No. ZL201510534543.6)
• Lightweight and breathable headband included
• Constructed from aero grade aluminum alloy
• HAIIImilitarygradehard-anodizednish
• Rating in accordance with IP67
• Impact resistant to 1 meter
Dimensions: 47.6mm×43.2mm×42.1mm (1.87"×1.7"×1.66")
HeadDiameter:φ40mm(φ1.57")
Weight: 117.5g (4.14oz)
(Bracket Included, Headband and Power Source Not Included)
142.5g (5.03oz)
(Bracket and Headband Included, Power Source Not Included)
2 x USB Cable Clips, Headband, USB Cable Fastener
Wristband Remote (Remote Control + Hook-and-loop Wristband)
FL1
STANDARD
100% Spotlight 100% Floodlight
TURBO HIGH MID LOW
ULTRALOW
TURBO HIGH MID LOW
ULTRALOW
*1,600
Lumens
480
Lumens
200
Lumens
50
Lumens
5
Lumens
*1,200
Lumens
480
Lumens
200
Lumens
50
Lumens
5
Lumens
1h
30min
5h
9h
30min
23h 45h 1h
4h
30min
7h
30min
21h 45h
162m 88m 56m 28m 9m 37m 24m 15m 7m 2m
6,570cd 1,940cd
790cd 200cd 22cd 348cd 149cd 60cd 15cd 1cd
1m (Impact Resistance)
IP67
Note:Thestateddataismeasuredinaccordancewiththeinternationalashlight
testing standards ANSI/PLATO FL 1-2019, using a 5,000mAh power bank under
laboratoryconditions.Thedatamayvaryinrealworlduseduetodierentbattery
usage or environmental conditions.
* It is recommended to use a power source available with 18W or above QC output.
Otherwise the TURBO Level is not accessible.
Power Source Options
Compatibility
NITECORE NPB Series Power Bank Y (Recommended)
USB Power Source (18W or Above QC Output Available) Y (Recommended)
USB Power Source (5V/2A or Above Output Available) Y (Compatible)
Note:
1. The NITECORE NPB Series Power Bank is recommended as it is available with
QC2.0/3.0 output and has a cable lock on the output ports specially designed for
the USB cable of the HU60 to prevent accidental disconnection from the power
source.
2. The TURBO Level is not accessible if the output of the USB power source is below
18W.
3. Please use a USB power source made by professional manufacturers or sold by
authorized dealers to avoid the risk of accidents.
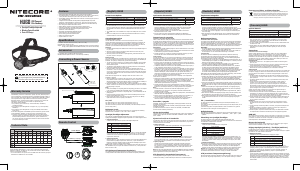
Operating Instructions
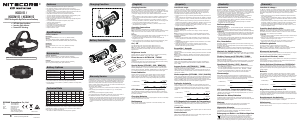
Connecting a Power Source
Use the USB cable of the HU60 to connect an external power source, and the
indicator beneath the Power Button on the headlamp will fade in/out constantly for
notication.TheNITECORENPBSeriesPowerBankisrecommendedasithasa
cable lock on the output ports specially designed for the USB cable of the HU60 as
illustrated to prevent accidental disconnection from the power source.
Warnings:
1. CAUTION! Possible dangerous radiation! Don't look into the light! Maybe dangerous
for your eyes.
2. When the product is kept in a backpack, please disconnect it from the power
source to prevent accidental activation.
3. When the product is left unused for a prolonged time, please disconnect it from
the power source to save power.
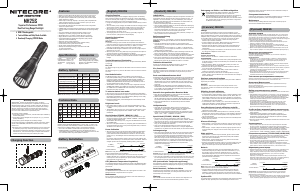
Remote Control
The HU60 is designed with a wristband remote for wireless control. After pairing, the
buttons on the remote control have the same functions as those on the headlamp as
illustrated. The pairing is already factory preset before packaging.
• The remote control is powered by a 3V CR2025 Button Cell Battery which enables
approx. 10,000 presses. The standby time is approx. 12 months if the battery is
inserted with full power.
• Theeectiveremotedistanceisapprox.2m(6.56ft)iftherearenoobstructions
between the headlamp and the remote control.
• When the battery of the remote control needs to be replaced, please use a
screwdriver or a coin to unscrew the cover counterclockwise until one of the dots
on the cover is aligned with the unlock symbol, insert the battery with the positive
end outwards, and then screw the cover clockwise until one of the dots is aligned
with the lock symbol.
Please follow the steps below for re-pairing if either the remote control or the
headlamp is replaced:
1. After the headlamp is connected to the power source, press and hold both the
Power Button and the T Button on the headlamp for over 3 seconds until the
indicatorbeneaththePowerButtonashesquicklytoindicatethattheheadlampis
in the pairing status. (This status will last for approx. 30 seconds)
2. When the headlamp is in the pairing status, press and hold both the Power Button
and the T Button on the remote control until the headlamp is turned on to indicate
that the pairing is complete.
Note:
1.
When the headlamp is in the pairing status but the pairing procedure is not complete
in 30 seconds, the headlamp will automatically return to the standby status.
2. When the headlamp is turned on in the pairing status, it will automatically exit the
pairing status.
3. During the pairing procedure, please ensure that the headlamp and the remote
control are kept within 30cm (11.8").
4. Please replace the battery of the remote control when its power is low. Battery
replacement will not cause re-pairing of the devices.
On / O
On:Whenthelightiso,longpressthePowerButtontoturniton.
O:Whenthelightison,longpressthePowerButtontoturnito.
(The HU60 has memory function. When reactivated, it will automatically access the
previous using status.)
Brightness Levels
When the light is on, short press the Power Button to cycle through the following
brightness levels: ULTRALOW – LOW – MID – HIGH – TURBO.
Spotlight/Floodlight Adjustment
TheHU60hasaspotlight/oodlightadjustmentfunction.Theoutputratioofthe
spotlightandoodlightissteppedorsteplessadjustableonacertainbrightnesslevel.
• Stepped Adjustment
5 modes of the output ratio are preset in the Stepped Adjustment.
M1 100% Floodlight
M2 75% Floodlight + 25% Spotlight
M3 50% Floodlight + 50% Spotlight
M4 25% Floodlight + 75% Spotlight
M5 100% Spotlight
Whenthelightison,shortpresstheWButtoneachtimetoincreasetheoodlight
output and decrease the spotlight output until it reaches M1; or short press the
TButtoneachtimetoincreasethespotlightoutputanddecreasetheoodlight
output until it reaches M5.
• Stepless Adjustment
Whenthelightison,pressandholdtheWButtontoincreasetheoodlightoutput
and decrease the spotlight output until it reaches M1; or press and hold the T
Buttontoincreasethespotlightoutputanddecreasetheoodlightoutputuntilit
reaches M5. Release to select the desired status.
Note: Only M1 and M5 are available on the ULTRALOW Level. When the output is on
the ULTRALOW Level, short press the W Button to switch to M1; or short press the T
Button to switch to M5.
ATR (Advanced Temperature Regulation)
The integrated ATR technology regulates the output of the HU60 according to the
working condition and ambient environment to maintain the optimal performance.
Opciones de alimentación
Compatibilidad
Banco de poder NITECORE serie NPB S (Recomendado)
Fuente de alimentación USB (18W disponible o mayor salida QC) S (Recomendado)
Fuente de alimentación USB (5V/2A de salida disponible o mayor)
S (Compatible)
Nota:
1.SerecomiendaelbancodepoderNITECOREserieNPB,yaquetienesalida
QC2.0/3.0disponibleycuentaconbloqueodecableenlospuertosdesalida
especialmente diseñado para el cable USB de la HU60, esto para prevenir
desconexión accidental de la fuente de alimentación.
2. El nivel de intensidad TURBO no es accesible si la salida de la fuente de
alimentación USB es menor a 18W.
3. Por favor utilice una fuente de alimentación USB hecha por fabricantes
profesionales o vendida por distribuidores autorizados para evitar accidentes.
Instrucciones de operación
Conectar a una fuente de alimentación
Utilice el cable USB de la HU60 para conectar a una fuente de alimentación externa,
el indicador situado debajo del botón de encendido en la linterna encenderá/apagará
constantementeparanoticar.SerecomiendautilizarelbancodepoderNITECORE
serieNPByaquecuentaconunbloqueadordecableespecialmentediseñadoparael
cable de la HU60 en el puerto de salida tal como se muestra en la imagen, esto para
prevenir desconexión accidental de la fuente de alimentación.
Advertencias:
1. ¡PRECAUCIÓN! ¡Posible radiación peligrosa! ¡No mire directamente a la luz! Puede
ser peligroso para sus ojos.
2. Cuando el producto se guarde en una mochila, por favor desconéctelo de la fuente
de alimentación para prevenir activación accidental.
3. Cuando el producto no se utilice por periodos prolongados de tiempo, por favor
desconéctelo de la fuente de alimentación para ahorrar batería.
Control remoto
LA HU60 está diseñada con un control remoto inalámbrico de muñeca. Después del
emparejamiento, como se muestra en la imagen, los botones en el control remoto
tendránlasmismasfuncionesquelosbotonesenlalinterna.Elemparejamientoya
viene preestablecido de fábrica desde antes del embalaje.
• Elcontrolremotoesalimentadoporunabateríadebotón3VCR2025quepermite
aproximadamente 10,000 pulsaciones. El tiempo de espera es de aproximadamente
12 meses si la batería es insertada con carga completa.
• La distancia efectiva del control remoto es de aproximadamente 2m (6.56 pies) si
no hay obstáculos entre la linterna y el control remoto.
• Cuando la batería del control remoto necesita ser reemplazada, por favor utilice un
desarmador o una moneda para desatornillar en sentido contrario a las manecillas
delrelojlacubiertahastaqueunodelospuntosdelatapaestéalineadoconel
símbolodedesbloqueo,insertelabateríaconelpolopositivohaciaafuera,ya
continuación,atornillelatapaensentidodelasmanecillasdelrelojhastaqueuno
delospuntosestéalineadoconelsímbolodebloqueo.
Por favor realice los siguientes pasos para volver a emparejar si se reemplazan el
control remoto o la linterna:
1. Después de conectar la linterna a una fuente de alimentación, presione y mantenga
presionados los botones de encendido y el botón T en la linterna por más de
3segundoshastaqueelindicadordebajodelbotóndeencendidoparpadee
rápidamenteparaindicarquelalinternaestáenestadodeemparejamiento.(Este
estado durará aproximadamente 30 segundos).
2. Cuando la linterna está en modo de emparejamiento, presione y mantenga
presionadoslosbotonesdeencendidoyelbotónTenelcontrolremotohastaque
lalinternaseenciendaparaindicarqueelemparejamientosehacompletado.
Nota:
1. Cuando la linterna se encuentra en estado de emparejamiento, pero el
procedimiento no se complete en 30 segundos, la linterna automáticamente
regresará al modo de espera.
2. Cuando la linterna es encendida en el estado de emparejamiento, automáticamente
saldrá del estado de emparejamiento.
3.Duranteelprocesodeemparejamiento,porfavorasegúresequelalinternayel
control remoto se mantengan dentro de un margen de 30 cm (11.8").
4. Por favor reemplace la batería del control remoto cuando la carga sea baja. El
cambio de batería no causará el re-emparejamiento de los dispositivos.
Encendido / Apagado
Encendido: Cuando la linterna está apagada, mantenga presionado el botón de
encendido para encender.
Apagado: Cuando la linterna está encendida, mantenga presionado el botón de
encendido para apagar.
(La HU60 tiene función de memoria. Cuando es reactivada, automáticamente
accederá al modo utilizado previamente).
Niveles de intensidad
Cuando la linterna está encendida, presione ligeramente el botón de encendido para
cambiar entre los siguientes niveles de intensidad: ULTRABAJO – BAJO – MEDIO –
ALTO – TURBO.
Ajuste Luz focal/Luz de inundación
La HU60 tiene una función de ajuste de la luz focal/luz de inundación. La relación de
salida de la luz focal y la luz de inundación es de forma escalonada o progresiva en
un determinado nivel de intensidad.
• Ajuste escalonado
5 modos de relación de salida están preestablecidos en el ajuste escalonado.
M1 100% Luz de inundación
M2 75% Luz de inundación + 25% Luz focal
M3 50% Luz de inundación + 50% Luz focal
M4 25% Luz de inundación + 75% Luz focal
M5 100% Luz focal
Cuando la luz está encendida, presione ligeramente el botón W cada vez para
incrementar la intensidad de la luz de inundación y disminuir la intensidad de
la luz focal hasta llegar a M1; o presione ligeramente el botón T cada vez para
incrementar la luz focal y disminuir la luz de inundación hasta llegar a M5.
• Ajuste progresivo
Cuando la luz está encendida, presione y mantenga presionado el botón W
para incrementar la luz de inundación y disminuir la luz focal hasta llegar a
M1; o presione y mantenga presionado el botón T para incrementar la luz focal
y disminuir la luz de inundación hasta llegar a M5. Suelte para seleccionar la
intensidad deseada.
Nota: Sólo M1 y M5 están disponibles en el nivel ULTRABAJO. Cuando la intensidad
está en el modo ULTRABAJO, presione ligeramente el botón W para cambiar a M1; o
presione ligeramente el botón T para cambiar a M5.
ATR (Regulación Avanzada de Temperatura)
La tecnología ATR integrada regula la potencia de la HU60 de acuerdo a las
condiciones de trabajo y medio ambiente para mantener un rendimiento óptimo.
Zugelassene Ladegeräte
Kompatibilität
NITECORE Power Bank der NPB Serie JA (empfohlen)
USBStromquelle(18Wodermehr,QCOutputverfügbar) JA (empfohlen)
USBStromquelle(5V/2AoderhöhereLeistung) JA (kompatibel)
Hinweise:
1. Das Netzteil der NITECORE NPB-Serie wird empfohlen, da es mit
QC2.0/3.0-AusgangerhältlichistundübereineKabelverriegelunganden
Ausgangsanschlüssenverfügt,diespeziellfürdasUSB-KabeldesHU60entwickelt
wurde,umeinversehentlichesTrennenvonderStromquellezuverhindern.
2.DieTURBO-Stufeistnichtzugänglich,wennderAusgangderUSB-Stromquelle
unter 18 W liegt.
3.BitteverwendenSieeineUSB-Stromquelle,dievonprofessionellenHerstellern
hergestellt oder von autorisierten Händlern verkauft wird, um Unfallrisiken zu
vermeiden.
Bedienungsanleitung
Anschließen einer Stromquelle
VerwendenSiedasUSB-KabelderHU60,umeineexterneStromquelleanzuschließen.
AlsIndikatorpulsiertdieLEDunterderEin/Aus-TasteanderKopampe.Eswirddas
Netzteil der NITECORE NPB-Serie empfohlen, da es - wie in der Abbildung gezeigt -
übereineKabelverriegelungverfügt,diespeziellfürdasUSB-KabelderHU60entwickelt
wurde.SowirdeinversehentlichesTrennenvonderStromquellesicherverhindert.
WARNUNG:
1.ACHTUNG!MöglicherweisegefährlicheoptischeStrahlung!BeiBetriebnichtdirekt
indasLichtblicken.DieskannfürdieAugengefährlichsein!
2. Wenn das Produkt in einem Rucksack aufbewahrt wird, trennen Sie es bitte von
derStromquelle,umeineversehentlicheAktivierungzuverhindern.
Fernsteuerung
Die HU60 ist mit einer Fernbedienung mit Armband zur drahtlosen Steuerung
ausgestattet. Nach dem Koppeln haben die Tasten auf der Fernbedienung die
gleichenFunktionenwiedieaufderKopampe-wieinderAbbildungdargestellt.
Das Koppeln ist bereits werkseitig voreingestellt.
• Die Fernbedienung wird mit einer 3V-Knopfzellenbatterie CR2025 betrieben, die ca.
10000Betätigungenermöglicht.DieStandby-Zeitbeträgtca.12Monate,wenndie
Batterie mit voller Leistung eingelegt wird.
• Die wirksame Reichweite der Fernbedienung beträgt ca. 2m, wenn sich keine
HindernissezwischenKopampeundderFernbedienungbenden.
• Wenn die Batterie der Fernbedienung ausgewechselt werden muss, schrauben
SiebittemiteinemSchraubendreherodereinerMünzedieAbdeckunggegen
den Uhrzeigersinn auf, bis sich einer der Punkte auf der Abdeckung mit dem
Entriegelungssymbolgegenübersteht.LegenSiedieBatteriemitderpositivenSeite
nachaußeneinunddrehenSiedanndieAbdeckungimUhrzeigersinn,biseiner
derPunkteaufderAbdeckungdemVerriegelungssymbolgegenübersteht.
BittebefolgenSiediefolgendenSchrittefürdieerneuteKoppelung,wennentweder
dieFernbedienungoderdieKopampeausgetauschtwird:
1.NachdemdieKopampeandieStromquelleangeschlossenist,drückenundhalten
SiesowohldieEin-/Aus-TastealsauchdieT-TasteanderKopampelängerals3
Sekundenlanggedrückt,bisdieAnzeigeunterderEinschalttasteschnellblinkt.
Dieszeigtan,dasssichdieKopampeimKoppelung-Modebendet.(DieserStatus
dauert ca. 30 Sekunden.)
2.WennsichdieKopampeimKopplungs-Modebendet,haltenSiesowohldieEin-/
Aus-TastealsauchdieT-TasteaufderFernbedienunggedrückt,bisdieKopampe
eingeschaltet wird. Dies zeigt an, dass die Koppelung erfolgreich abgeschlossen ist.
Hinweis:
1.WennsichdieKopampeimKopplungs-Modebendet,derKopplungsvorgang
jedochnichtinnerhalbvon30Sekundenabgeschlossenist,kehrtdieKopampe
automatischindenBereitschaftsstatuszurück.
2.WenndieKopampewährenddesKopplungs-Modeseingeschaltetwird,verlässt
sie diesen automatisch.
3.BittestellenSiewährenddesKopplungsvorgangssicher,dassdieKopampeund
die Fernbedienung sich nicht weiter als 30 cm voneinander entfernen.
4. Bitte tauschen Sie die Batterie der Fernbedienung aus, wenn ihre Leistung schwach
ist.EinBatteriewechselführtnichtzueinemerneutenKoppelungsvorgangder
Geräte.
Ein- / Ausschalten
An:WenndasLichtausist,drückenSielangeaufdenEin/Aus-Schalter,umes
einzuschalten.
Aus:WenndasLichteingeschaltetist,drückenSielangeaufdieEin/Aus-Taste,umes
auszuschalten.
(DieHU60verfügtübereineSpeicherfunktion.Wennsiereaktiviertwird,greiftsie
automatisch auf den vorherigen Verwendungsstatus zu).
Helligkeitsstufen
WenndasLichteingeschaltetist,drückenSiekurzaufdenEin/Aus-Schalter,umdie
folgenden Helligkeitsstufen zu durchlaufen: „ULTRALOW“ – „LOW“ – „MID“ – „HIGH“
– „TURBO“.
Einstellung von Spotlight/Floodlight
DieHU60verfügtübereineSpotlight/Floodlight-Einstellfunktion.Das
Ausgangsverhältnis von Spotlight und Scheinwerfer ist stufenweise oder stufenlos auf
ein bestimmtes Helligkeitsniveau einstellbar.
• Stufenweise Einstellung
5 Modi der Leistungsverhältnisse sind voreingestellt.
M1 100% Floodlight
M2 75% Floodlight + 25% Spotlight
M3 50% Floodlight + 50% Spotlight
M4 25% Floodlight + 75% Spotlight
M5 100% Spotlight
WenndasLichteingeschaltetist,drückenSiedenW-Knopfwiederholtkurz,um
denAnteilFloodlightzuerhöhenunddieLeistungdesSpotlightzuverringernbis
sieStufeM1erreichen.DrückenSiedenT-Knopfwiederholtkurz,umdenAnteil
SpotlightzuerhöhenunddieLeistungdesFloodlightzuverringern,bissieStufe
M5 erreichen.
• Stufenlose Einstellung
WenndasLichteingeschaltetist,drückenundhaltenSiedenW-Knopf,umdenAnteil
FloodlightzuerhöhenunddieLeistungdesSpotlightzuverringernbissieStufe
M1erreichen.DrückenundhaltenSiedenT-Knopf,umdenAnteilSpotlightzu
erhöhenunddieLeistungdesFloodlightzuverringern,bissieStufeM5erreichen.
Hinweis: M1undM5sindnurim„ULTRALOW“-Modeverfügbar.Wennsichdie
Leistungauf„ULTRALOW“bendet,drückenSiekurzdenW-Knopf,umaufM1
umzuschaltenoderdrückenSiekurzdenT-Knopf,umaufM5umzuschalten.
ATR (erweiterte Temperaturregulierung)
Mit dem "Advanced Temperature Regulation"-Modul regelt die HU60 ihre Leistung und
passt sich der Umgebungs-temperatur an, um so die optimale Leistung zu erhalten.
Options Batterie
Compatibilité
Batterie externe NITECORE NPB Series oui (Recommandé)
USB Power Source (18W or Above QC Output Available) oui (Recommandé)
USB Power Source (5V/2A or Above Output Available) oui (Compatible)
1. La batterie externe NPB de NITECORE est recommandée car elle est disponible
avec une sortie QC2.0 / 3.0 et possède un verrouillage sur les ports de sortie
spécialementconçupourlecâbleUSBduHU60and'éviterunedéconnexion
accidentelle de la source d'alimentation.
2. Le niveau TURBO n'est pas accessible si la sortie de la source d'alimentation USB
est inférieure à 18 W.
3.Veuillezutiliserunesourced'alimentationUSBfabriquéepardesfabricants
professionnelsouvenduepardesrevendeursagrééspouréviterlesrisques
d'accidents.
Instructions
Connection à une source d’énergie
Utilisez le câble USB fourni pour connecter la HU60 à une source d'alimentation
externe, et l'indicateur lumineux de l’interrupteur sur le projecteur s'allumera /
s'éteindra constamment pour informer l’utilisateur. La batterie externe NPB de
NITECORE est recommandée car elle possède un verrouillage sur les ports de sortie
spécialement conçu pour le câble USB de la HU60 comme illustré pour éviter une
déconnexion accidentelle de la source d'alimentation.
Avertissements:
1. ATTENTION! Lumière forte ! Ne regardez pas la lumière! Peut-être dangereux
pour vos yeux.
2.Lorsqueleproduitestconservédansunsacàdos,veuillezledéconnecterdela
source d'alimentation pour éviter toute activation accidentelle.
3.Lorsqueleproduitn'estpasutilisépendantunepériodeprolongée,veuillezle
déconnecter de la source d'alimentation pour économiser de l'énergie.
Télécommande
La lampe HU60 est conçue avec une télécommande au poignet pour un contrôle sans
l.Aprèslecouplage,lesboutonsdelatélécommandeontlesmêmesfonctionsque
ceux de la lampe comme illustré. La connexion est déjà préréglée en usine avant
l'emballage.
• Latélécommandeestalimentéeparunepilebouton3VCR2025quipermetenv.
10 000 pressions. Le temps de veille est d'env. 12 mois si la batterie est insérée à
pleine puissance.
• Ladistanceeectiveestd'env.2ms'iln'yapasd'obstaclesentrelalampeetla
télécommande.
• Lorsquelapiledelatélécommandedoitêtreremplacée,veuillezutiliserun
tournevis ou une pièce pour dévisser le couvercle dans le sens antihoraire
jusqu'àcequel'undespointssurlecouverclesoitalignéaveclesymbolede
déverrouillage, insérez la pile avec l'extrémité positive vers l'extérieur, et puis
vissezlecouvercledanslesensdesaiguillesd'unemontrejusqu'àcequel'undes
points soit aligné avec le symbole de verrouillage.
Veuillezsuivrelesétapesci-dessouspourreconnecterlesappareilslorsquela
télécommande ou la lampe frontale est remplacée:
1. Une fois la lampe connectée à la source d'alimentation, maintenez enfoncés
l’interrupteuretleboutonTdelalampependantplusde3secondesjusqu'àce
quel'indicateursousl’interrupteurclignoterapidementpourindiquerquelalampe
est en cours de connexion. (Cet état durera environ 30 secondes)
2.Lorsquelalampeestencoursdeconnexion,maintenezenfoncésl’interrupteuret
leboutonTdelatélécommandejusqu'àcequelalampes’allumepourindiquer
quelaconnexionestterminée.
Remarque:
1.Lorsquelalampeestencoursdeconnexionmaisquelaprocéduren'estpas
terminéedansles30secondes,lalamperepasseautomatiquementenétatde
veille.
2.Lorsquelalampeestalluméependantlaconnexion,ellequitteautomatiquement
cet état.
3.Pendantlaprocéduredeconnexion,veuillezvousassurerquelalampeetla
télécommande sont maintenues à moins de 30 cm .
4.Veuillezremplacerlapiledelatélécommandelorsquesonalimentationestfaible.
Le remplacement de la batterie n'entraînera pas de recouplage des appareils.
ONN/OFF
On:Lorsquelalumièreestéteinte,appuyezlonguementsurl’interrupteurpourl'allumer.
Éteint:lorsquelevoyantestallumé,appuyezlonguementsurl’interrupteurpourl'éteindre.
(LaHU60aunefonctiondemémoire.Lorsqu'elleestréactivée,elleaccède
automatiquementàl'étatd'utilisationprécédent.)
Niveaux de luminosité
Quand la lampe est allumée, appuyer légèrement sur l’interrupteur pour naviguer
entre les niveaux ULTRALOW – LOW – MID – HIGH – TURBO.
Réglage Spotlight (précision) / Floodlight (ambiance)
La HU60 dispose d'une fonction de réglage du spotlight (précision) /
oodlight(ambiance).Lerapportdesortiespotlightetoodlightestétagéouréglable
en continu sur un certain niveau de luminosité.
• Réglages par étapes :
5modesdesortiesontprédénisdansleréglageparétapes:
M1 100% Floodlight (ambiance)
M2 75% Floodlight (ambiance) + 25% Spotlight (précision)
M3 50% Floodlight (ambiance) + 50% Spotlight (précision)
M4 25% Floodlight (ambiance) + 75% Spotlight (précision)
M5 100% Spotlight (précision)
Lorsquelalumièreestallumée,appuyezbrièvementsurleboutonWpour
augmenterchaquefoislasortieduoodlight(ambiance)etdiminuerlasortiedu
spotlight(précision)jusqu'àcequ'elleatteigneM1;ouappuyezbrièvementsur
leboutonTàchaquefoispouraugmenterlasortieduspotlight(précision)et
diminuerlasortieduoodlight(ambiance)jusqu'àcequ'elleatteigneM5.
• Ajustement continu
Lorsquelalumièreestallumée,appuyezsurleboutonWetmaintenez-leenfoncé
pouraugmenterlasortieduoodlight(ambiance)etdiminuerlasortieduspotlgiht
(précision)jusqu'àcequ'ilatteigneM1;ouappuyezsurleboutonTetmaintenez-
le enfoncé pour augmenter la sortie du spotlight (précision) et diminuer la sortie
duoodlight(ambiance)jusqu'àcequ'ilatteigneM5.Relâchezpoursélectionner
l'état souhaité.
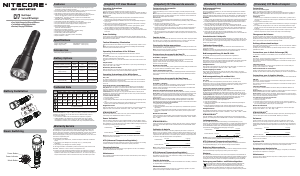
NITECORE
NPB Series
Power Bank
Power Button
T Button
(for Spotlight)
W Button
(for Floodlight)
Warranty Service
All NITECORE
®
productsarewarrantedforquality.AnyDOA/defectiveproduct
can be exchanged for a replacement through a local distributor/dealer within 15
days of purchase. After that, all defective / malfunctioning NITECORE
®
products
can be repaired free of charge within 60 months from the date of purchase.
Beyond 60 months, a limited warranty applies, covering the cost of labor and
maintenance, but not the cost of accessories or replacement parts.
Thewarrantywillbenulliedif
1.theproduct(s)is/arebrokendown,reconstructedand/ormodiedby
unauthorized parties;
2. the product(s) is/are damaged due to improper use; (e.g. reversed polarity
installation)
3.theproduct(s)is/aredamagedduetousinganunociallyrecommended
power source.
For the latest information on NITECORE
®
products and services, please contact
a local NITECORE
®
※Allimages,textandstatementsspeciedhereinthisusermanualarefor
reference purpose only. Should any discrepancy occur between this manual
andinformationspeciedonwww.nitecore.com,SysmaxInnovationsCo.,
Ltd. reserves the rights to interpret and amend the content of this document
at any time without prior notice.
Caution: When the product is left unused
for a prolonged time, please disconnect it
from the power source to save power.
POWER BANK
POWER BANK
USB Cable Fastener
Entsorgung von Elektro- und Elektronikgeräten
DiedurchgestricheneMülltonnebedeutet,dassSiegesetzlichverpichtetsind,diese
GeräteeinervomunsortiertenSiedlungsabfallgetrenntenErfassungzuzuführen.Die
EntsorgungüberdieRestmülltonneoderdiegelbeTonneistuntersagt.Enthaltendie
ProdukteBatterienoderAkkus,dienichtfestverbautsind,müssendiesevorder
Entsorgung entnommen und getrennt als Batterie entsorgt werden.


Приєднуйтесь до розмови про цей продукт
Тут ви можете поділитися своєю думкою про Nitecore HU60 Ліхтарик. Якщо у вас є питання, спочатку уважно прочитайте інструкцію. Запит на інструкцію можна зробити за допомогою нашої контактної форми.