Specifications are subject to change without notice
© 2014 Koninklijke Philips N.V.
All rights reserved.
HD3134_UM_RU_V2.0_141125
HD3134
Мультиварка
Мультипісіргіш
Мультиварка
Register your product and get support at
www.philips.com/welcome
Always there to help you
Question?
Contact
Philips
English
1 Your multi-cooker
Congratulations on your purchase, and welcome to Philips!
To fully benet from the support that Philips offers, register your
product at www.Philips.com/welcome.
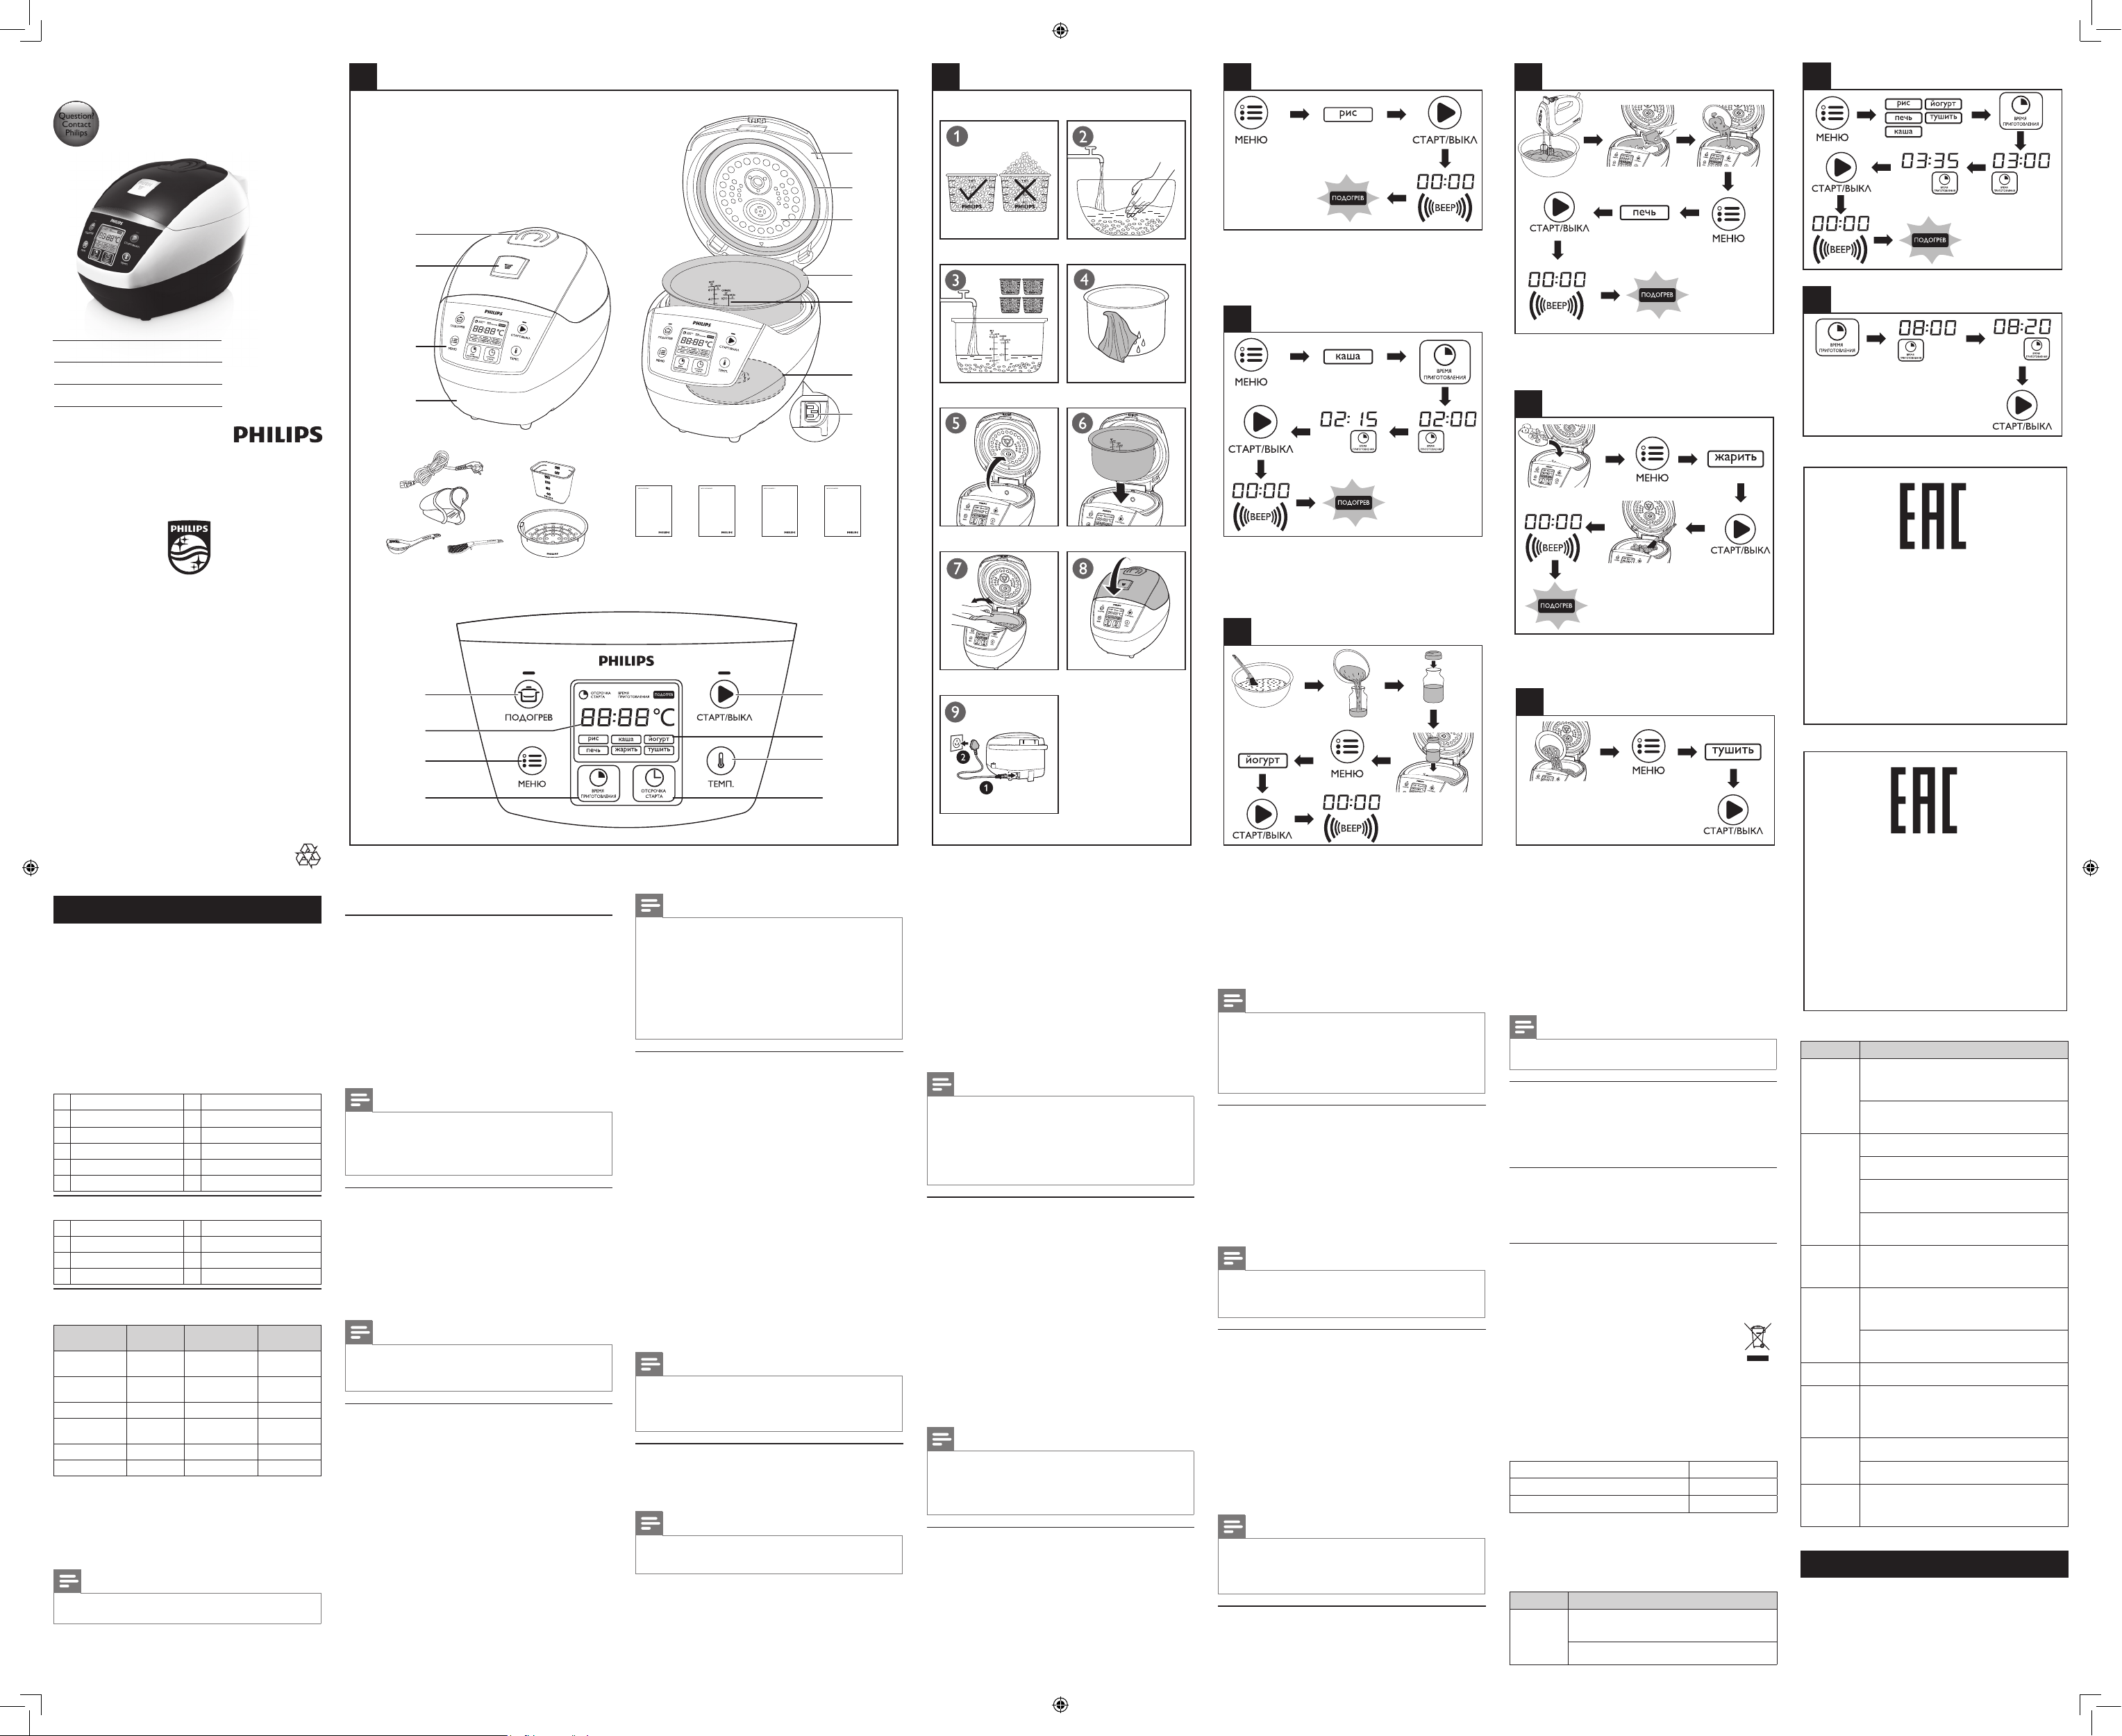
2 What’s in the box (fig.1)
Multi-cooker main unit Steamer
Rice scoop Soup ladle
Silicon gloves Measuring cup
User manual Safety leaet
Recipe Warranty card
3 Overview
a
Detachable steam vent cap
g
Water level indications
b
Lid release button
h
Inner pot
c
Control panel
i
Detachable inner lid
d
Main body
j
Sealing ring
e
Power socket
k
Top lid
f
Heating element
Controls overview
l
Keep-warm button
p
Preset button
m
Display
q
Temperature button
n
Menu button
r
Cooking functions
o
Cooking time button
s
Start/Off button
Functions overview
Functions Default
cooking time
Adjustable
cooking time
Preset time
Rice (рис) 30 - 40
Minutes
/ 1 - 24 Hours
Congee (каша)
10 Minutes
5 minutes - 2
hours
1 - 24 Hours
Fry (жарить) 15 Minutes 5 - 60 minutes /
Stew (тушить)
1 hour
20 minutes - 10
hours
1 - 24 Hours
Bake (печь) 45 Minutes 20 - 120 minutes 1 - 24 hours
Yogurt (йогурт) 8 hours 6 - 12 hours 1 - 24 hours
4 Before first use
1 Take out all the accessories from the inner pot. Remove the
packaging material of the inner pot.
2 Clean the parts of the multi-cooker thoroughly before using it for
the rst time (see chapter ‘Cleaning and Maintenance’).
Note
•
Make sure all parts are completely dry before you start using the multi-
cooker.
5 Using the multi-cooker
Preparations before cooking (g.2)
Before using the multi-cooker, you need to follow below preparations:
1 Measure the rice using the measuring cup provided.
2 Wash the rice thoroughly.
3 Put the pre-washed rice in the inner pot.
4 Add water to the level indicated on the scale inside the inner pot
that corresponds to the number of cups of rice used. Then smooth
the rice surface.
5 Press the lid release button to open the lid.
6 Wipe the outside of the inner pot dry, then put the inner pot in
the multi-cooker. Check if the inner pot is in proper contact with
the heating element.
7 Close the lid of the multi-cooker, and put the plug in the power
socket.
Note
•
Each cup of uncooked rice normally gives 2 bowls of cooked rice. 1 cup of
rice is approximately 180ml.
• The level marked inside the inner pot is just an indication. You can always
adjust the water level for different types of rice and your own preference.
• Make sure that the outside of the inner pot is clean and dry, and that
there is no foreign residue on the heating element or the magnetic switch.
Rice cooking (g.3)
1 Follow the steps in “Preparations before cooking”.
2 Press the menu button (МЕНЮ) until the rice cooking function
(Рис) is selected.
» The default cooking time starts ashing on the display.
3 Press the start button (СТАРТ/ВЫКЛ) to start cooking.
4 When the cooking is nished, you will hear a few beeps and the
selected cooking function light will be off.
5 The multi-cooker will be in keep-warm mode automatically.
» Keep-warm (ПОДОГРЕВ) is indicated on the display.
Note
•
After the cooking has started, you can press the start/off button (СТАРТ/
ВЫКЛ) to deactivate the cooking process, and the multi-cooker will be in
standby mode.
• The default cooking time is 30 to 40 minutes, and is not adjustable.
Cooking congee (g.4)
1 Follow the steps in “Preparations before cooking”.
2 Press the menu button (МЕНЮ) until the congee function (каша)
is selected.
» The default cooking time starts ashing on the display.
3 To set a different cooking time, press the cooking time button
(ВРЕМЯ ПРИГОТОВЛЕНИЯ), and the hour unit starts ashing
on the display.
4 Press the cooking time button (ВРЕМЯ ПРИГОТОВЛЕНИЯ)
repeatedly to set the hour unit.
5 Once the hour unit is set, wait for a few seconds before the multi-
cooker automatically conrms the hour unit, and the minute unit
starts ashing on the display.
6 Press the cooking time button (ВРЕМЯ ПРИГОТОВЛЕНИЯ)
repeatedly to set the minute unit.
7 After the cooking time is set, press the start button (СТАРТ/
ВЫКЛ) to start cooking.
8 When the cooking is nished, you will hear a few beeps and the
selected cooking function light will be off.
9 The multi-cooker will be in keep-warm mode automatically.
» Keep-warm (ПОДОГРЕВ) is indicated on the display.
Note
•
Do not exceed the volume indicated nor exceed the maximum water level
indicated in the inner pot, as this may cause the multi-cooker to overow.
• It is normal to nd the congee stickier if it is left in keep-warm mode for
too long.
• If the voltage is unstable at the area you live, it is possible that the multi-
cooker overows.
• After the cooking has started, you can press the start/off button (СТАРТ/
ВЫКЛ) to deactivate the cooking process, and the multi-cooker will be in
standby mode.
• In congee mode, the cooking time only starts counting down when the
water starts boiling.
• The default cooking time is 10 minutes. You can select the cooking time
between 5 minutes to 2 hours.
Making yogurt (g.5)
1 Whisk the ingredients for the yogurt well and put them in a glass
container.
2 Put the glass container in the inner pot. Make sure that the
container is sealed.
3 Pour some water in the inner pot. Make sure that half of the
container is immersed in water.
4 Follow steps 6 and 7 in “Preparations before cooking”.
5 Press the menu button (МЕНЮ) until the yogurt function
(йогурт) is selected.
» The default cooking time starts ashing on the display.
6 To set a different cooking time, press the cooking time button
(ВРЕМЯ ПРИГОТОВЛЕНИЯ), and the hour unit starts ashing
on the display.
7 Press the cooking time button (ВРЕМЯ ПРИГОТОВЛЕНИЯ)
repeatedly to set the hour unit.
8 Once the hour unit is set, wait for a few seconds before the multi-
cooker automatically conrms the hour unit, and the minute unit
starts ashing on the display.
9 Press the cooking time button (ВРЕМЯ ПРИГОТОВЛЕНИЯ)
repeatedly to set the minute unit.
10 After the cooking time is set, press the start button (СТАРТ/
ВЫКЛ) to start cooking.
11 When the cooking is nished, you will hear a few beeps and the
selected cooking function light will be off.
12 The multi-cooker will be in standby mode automatically.
Note
•
After the cooking has started, you can press the start/off button (СТАРТ/
ВЫКЛ) to deactivate the cooking process, and the multi-cooker will be in
standby mode.
• The default cooking time is 8 hours. You can select the cooking time
between 6 to 12 hours.
Baking (g.6)
1 Put the food and ingredients in the inner pot.
2 Follow step 6 in “Preparations before cooking”.
3 Put the plug in the power socket.
Note
•
When baking cake, keep the lid closed during cooking. Baking cake at
130°C and by 45 minutes usually delivers best cooking result.
• When baking food other than cake, the lid must be opened during cooking.
4 Press the menu button (МЕНЮ) until the baking function (печь)
is selected.
» The default cooking time starts ashing on the display.
5 To set a different cooking temperature, press the temperature
button (ТЕМП.), and the default cooking temperature starts
ashing on the display.
6 Press the temperature button (ТЕМП.) repeatedly to select the
cooking temperature.
6 Press the cooking time button (ВРЕМЯ ПРИГОТОВЛЕНИЯ)
repeatedly to set the minute unit.
7 After the cooking time is set, press the start button (СТАРТ/
ВЫКЛ) to start cooking.
8 When the cooking is nished, you will hear a few beeps and the
selected cooking function light will be off.
9 The multi-cooker will be in keep-warm mode automatically.
» Keep-warm (ПОДОГРЕВ) is indicated on the display.
Note
•
Do not exceed the volume indicated nor exceed the maximum water
level indicated in the inner pot, as this may cause the multi-cooker to
overow.
• After the cooking has started, you can press the start/off button (СТАРТ/
ВЫКЛ) to deactivate the cooking process, and the multi-cooker will be in
standby mode.
• The default cooking time is 1 hour. You can select the cooking time
between 20 minutes to 10 hours.
Keep-warm mode
The multi-cooker provides you with easy control over the keep-warm
mode.
• After you have selected the cooking function using the menu
button (МЕНЮ), if you press the start button (СТАРТ/ВЫКЛ)
directly, the keep-warm indicator will light up. After the cooking is
nished, the multi-cooker will switch to keep-warm mode directly.
• After you have selected the cooking function using the menu
button (МЕНЮ), if you press the keep-warm button rst, and
then the start button (СТАРТ/ВЫКЛ), the keep-warm indicator
will be off. After the cooking is nished, the multi-cooker will be in
standby mode.
Note
•
In standby mode, you can press the keep-warm button (ПОДОГРЕВ) to
enter keep-warm mode.
• In keep-warm mode, you can press the keep-warm button (ПОДОГРЕВ)
to enter standby mode.
Preset time for delayed cooking (g.9)
You can preset the delayed cooking time for different cooking modes.
1 Follow steps 6 and 7 in “Preparations before cooking”.
2 Press the menu button (МЕНЮ) to select a cooking function.
3 Press the preset button (ОТСРОЧКА).
» The default preset time starts ashing on the display.
4 Press the preset button (ОТСРОЧКА) repeatedly to select the
desired preset time.
5 After the preset time is set, press the start button (СТАРТ/
ВЫКЛ) to start cooking.
6 The cooking process will be nished when the preset time has
elapsed. You will hear a few beeps and the selected cooking
function light will be off.
7 The multi-cooker will be in keep-warm mode automatically.
» The keep- warm (ПОДОГРЕВ) indicator lights up.
Note
•
The preset function is not available in fry mode (жарить).
• The preset button is not responsive in standby mode.
• Before setting the preset time, you may set the cooking time rst.
• The default preset time is 4 hours. You can select the preset time between
1 to 24 hours.
Setting up the clock (g.10)
You can set up the clock on your multi-cooker when it is in standby
mode.
1 Press and hold the cooking time button (ВРЕМЯ
ПРИГОТОВЛЕНИЯ) for 3 seconds, and the hour unit starts
ashing on the display.
7 To set a different cooking time, press the cooking time button
(ВРЕМЯ ПРИГОТОВЛЕНИЯ), and the hour unit starts ashing
on the display.
8 Press the cooking time button (ВРЕМЯ ПРИГОТОВЛЕНИЯ)
repeatedly to set the hour unit.
9 Once the hour unit is set, wait for a few seconds before the multi-
cooker automatically conrms the hour unit, and the minute unit
starts ashing on the display.
10 Press the cooking time button (ВРЕМЯ ПРИГОТОВЛЕНИЯ)
repeatedly to set the minute unit.
11 After the cooking time is set, press the start button (СТАРТ/
ВЫКЛ) to start cooking.
12 When the baking is nished, you will hear a few beeps and the
selected function light will be off.
13 The multi-cooker will be in keep-warm mode automatically.
» Keep-warm (ПОДОГРЕВ) is indicated on the display.
Note
•
When removing the inner pot from the multi-cooker, use a kitchen glove
or a cloth, as the inner pot will be very hot.
• After the cooking has started, you can press the start/off button (СТАРТ/
ВЫКЛ) to deactivate the cooking process, and the multi-cooker will be in
standby mode.
• The default cooking time is 45 minutes. You can select the cooking time
from 20 minutes to 2 hours.
• The default cooking temperature is 100°C. You can select the temperature
between 40°C to 160°C.
Frying (g.7)
1 Put food and ingredients into the inner pot.
2 Follow step 6 in “Preparations before cooking”.
3 Put the plug in the power socket.
4 Press the menu button (МЕНЮ) until the frying function (жарить)
is selected.
» The default cooking time starts ashing on the display.
5 To set a different cooking time, press the cooking time button
(ВРЕМЯ ПРИГОТОВЛЕНИЯ), and the minute unit starts ashing
on the display.
6 Press the cooking time button (ВРЕМЯ ПРИГОТОВЛЕНИЯ)
repeatedly to set the minute unit.
7 After the cooking time is set, press the start button (СТАРТ/
ВЫКЛ) to start cooking.
8 During cooking, stir the food constantly using a spatula.
9 When the cooking is nished, you will hear a few beeps and the
selected cooking function light will be off.
10 The multi-cooker will be in keep-warm mode automatically.
» Keep-warm (ПОДОГРЕВ) is indicated on the display.
Note
•
Do not close the top lid when cooking in the fry mode.
• After the cooking has started, you can press the start/off button (СТАРТ/
ВЫКЛ) to deactivate the cooking process, and the multi-cooker will be in
standby mode.
• The default cooking time is 15 minutes. You can select the cooking time
between 5 to 60 minutes.
Stewing (g.8)
1 Follow steps 6 and 7 in “Preparations before cooking”.
2 Press the menu button (МЕНЮ) until the stewing function
(тушить) is selected.
» The default cooking time starts ashing on the display.
3 To set a different cooking time, press the cooking time button
(ВРЕМЯ ПРИГОТОВЛЕНИЯ), and the hour unit starts ashing
on the display.
4 Press the cooking time button (ВРЕМЯ ПРИГОТОВЛЕНИЯ)
repeatedly to set the hour unit.
5 Once the hour unit is set, wait for a few seconds before the multi-
cooker automatically conrms the hour unit, and the minute unit
starts ashing on the display.
2 Press the cooking time button (ВРЕМЯ ПРИГОТОВЛЕНИЯ)
repeatedly to set the hour unit.
3 Once the hour unit is set, wait for a few seconds before the multi-
cooker automatically conrms the hour unit, and the minute unit
starts ashing on the display.
4 Press the cooking time button (ВРЕМЯ ПРИГОТОВЛЕНИЯ)
repeatedly to set the minute unit.
5 After the minute unit is set, press the start button (СТАРТ/ВЫКЛ)
to conrm the clock.
6 Cleaning and Maintenance
Note
•
Unplug the multi-cooker before starting to clean it.
• Wait until the multi-cooker has cooled down sufciently before cleaning it.
Interior
Inside of the top lid and the main body:
• Wipe with wrung out and damp cloth.
• Make sure to remove all the food residues stuck to the multi-cooker.
Heating element:
• Wipe with wrung out and damp cloth.
• Remove food residues with wrung out and damp cloth.
Exterior
Surface of the top lid and outside of the main body:
• Wipe with a cloth damped with soap water.
• Only use soft and dry cloth to wipe the control panel.
• Make sure to remove all the food residues around the control
panel.
Accessories
Rice scoop, soup ladle, inner pot, steamer, and steam vent cap:
• Soak in hot water and clean with sponge.
7 Environment
Do not throw away the appliance with normal household
waste at the end of its life, but hand it in at an ofcial
collection point for recycling. By doing this, you can help to
preserve the environment.
8 Guarantee and service
If you need service or information, or if you have a problem, visit the
Philips website at www.philips.com or contact the Philips Customer
Care Center in your country. You can nd its phone number in the
worldwide guarantee leaet. If there is no Customer Care Center in
your country, go to your local Philips dealer.
9 Specifications
Model Number HD3134
Rated power output 650W
Rated capacity 3.0L
10 Troubleshooting
If you encounter problems when using this multi-cooker, check the
following points before requesting service. If you cannot solve the
problem, contact the Philips Consumer Care Center in your country.
Problem Solution
The light on
the button
does not
go on.
There is a connection problem. Check if the power
cord is connected to the multi-cooker properly and if
the plug is inserted rmly into the power outlet.
The light is defective. Take the appliance to your Philips
dealer or a service center authorized by Philips.
EN User manual
RU Руководство пользователя
UK Посібник користувача
1
www.philips.com/welcome
User manual
www.philips.com/welcome
Safety leaflet
www.philips.com/welcome
Warranty
www.philips.com/welcome
Recipe
o
2
a
b
c
d
f
g
h
i
k
j
e
l
n
m
p
q
r
s
3
4
5
6
7
8
9
3 sec
10
Problem Solution
The display
does not
function.
The multi-cooker is not connected to the power
supply. If there is no power supply, the power failure
backup function does not work and the display does
not function.
The battery for the display runs out of power. Take the
appliance to your Philips dealer or a service center
authorized by Philips to have the battery replaced.
The rice is
not cooked.
You didn't press the start button (СТАРТ/ВЫКЛ)
after the cooking function is selected.
There is not enough water. Add water according to
the scale on the inside of the inner pot.
Make sure that there is no foreign residue on the
heating element and the outside of the inner pot
before switching the multi-cooker on.
The heating element is damaged, or the inner pot
is deformed. Take the multi-cooker to your Philips
dealer or a service center authorized by Philips.
The rice is
too dry and
not well
cooked.
Add more water to the rice, and cook for a bit
longer.
The multi-
cooker does
not switch
to the keep-
warm mode
automatically.
You might have pressed the keep-warm button
(ПОДОГРЕВ) before pressing the start button
(СТАРТ/ВЫКЛ). In this case the multi-cooker will be
in standby mode after the cooking is nished.
The temperature control is defective. Take the
appliance to your Philips dealer or a service center
authorized by Philips.
The rice is
scorched.
You have not rinse the rice properly. Rinse the rice
until the water runs clear.
Water spills
out of the
multi-cooker
during
cooking.
Make sure that you add water to the level indicated
on the scale inside the inner pot that corresponds to
the number of cups of rice used.
Rice smells
bad after
cooking
Clean the inner pot with some washing detergent
and warm water.
After cooking, make sure the steam vent cap, inner lid
and inner pot is cleaned thoroughly.
Error message
(E1, E2, E3, or
E4) appears
on the display.
There has been a power failure during cooking. Take
the appliance to your Philips dealer or a service
center authorized by Philips.
Русский
1 Мультиварка
Поздравляем с покупкой, и добро пожаловать в клуб Philips!
Чтобы воспользоваться всеми преимуществами поддержки Philips,
зарегистрируйте приобретенное устройство на сайте www.
philips.com/welcome.
Изготовитель:
“Филипс Консьюмер Лайфстайл Б.В.”, Туссендиепен 4, 9206
АД, Драхтен, Нидерланды
Импортер на территорию России и Таможенного Союза:
ООО "ФИЛИПС", Российская Федерация, 123022 г.
Москва, ул. Сергея Макеева, д.13, тел. +7 495 961-1111
Сделано в Китае
Дата производства указана в серийном номере
устройства. Например, “XP1A1347000001” означает, что
изделие было произведено на 47-ой неделе 2013 года.
Өндіруші:
“Филипс Консьюмер Лайфстайл Б.В.”, Туссендиепен 4, 9206
АД, Драхтен, Нидерланды
Ресей және Кедендік Одақ территориясына импорттаушы:
"ФИЛИПС" ЖШҚ, Ресей Федерациясы, 123022 Мәскеу
қаласы, Сергей Макеев көшесі, 13-үй, тел. +7 495 961-1111
Қытайда жасап шығарылған
Өнімнің сериялық нөмірінен өндірілген күнін табуға болады.
Мысалы, «XP1A1347000001» өнімнің 2013 жылдың 47-ші
аптасында шығарылғанын білдіреді.

Приєднуйтесь до розмови про цей продукт
Тут ви можете поділитися своєю думкою про Philips HD3134 Рисоварка. Якщо у вас є питання, спочатку уважно прочитайте інструкцію. Запит на інструкцію можна зробити за допомогою нашої контактної форми.