Посібник Electrolux EUP86TBM Пилосос

Потрібен посібник для вашого Electrolux EUP86TBM Пилосос? Нижче ви можете безкоштовно переглянути та завантажити посібник у форматі PDF українською мовою. Наразі цей продукт має 10 поширених запитання, 0 коментарів і 1 голос із середньою оцінкою продукту 0/100. Якщо це не той посібник, який вам потрібен, будь ласка, зв’яжіться з нами.

Ваш товар несправний, а посібник не пропонує рішення? Перейдіть на Repair Café, щоб отримати безкоштовні послуги з ремонту.

Посібник

Loading…

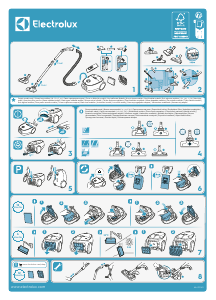
3www.electrolux.com2www.electrolux.com
13
11
5 6 7 8
15 16
17
9 10
12
1
3 42
14
For models EUP82xxx
UA
GB
FR
AR
BG
GR
NO
CZ
HR
PL
DA
HU
PT
DE
IT
RO
EE
LT
RU
ES
LV
SK
SR
FI
NL
SL
SV
TR
4www.electrolux.com
Electrolux reserves the right to change products, information and
specications without notice.
ENGLISH
Thank you for choosing an Electrolux Ultrapower® vacuum cleaner.
In order to ensure the best results, always use original Electrolux
accessories and spare parts. They have been designed especially for
your vacuum cleaner. This product is designed with the environment
in mind. All plastic parts are marked for recycling purposes.
DESCRIPTION OF ULTRAPOWER®
A. ON/OFF button
B. Power regulation button
C. Locking screw
D. Charging station, wall unit (*
E. Charging station, oor unit (*
F. Charging adapter
G. Fine lter (inner lter)
H. Pre lter (outer lter)
I. Release button, dust container
J. Dust container
(* Not available on models
EUP82xxx
K. Cable protector grill
L. Hatch cover for brush roll
M. Brush roll
N. BRUSHROLLCLEAN® pedal
O. Nozzle front lights
P. Charging indicator
Q. Cli hanger
R. Wall holder *)
S. Charging connector*)
*) Only on models EUP82xx.
BEFORE STARTING
Check that the package includes all parts described in this instruction
manual and read this manual carefully. Pay special attention to the
safety precautions chapter. Save these instructions.
1 Assemble the handle.
For model EUP82xx, use the wall holder *):
2 A) Make sure that Ultrapower® is on a stable and horizontal surface
away from heat sources, direct sunlight or wet places. Attach the wall
holder to the wall 104cm above the oor with a suitable screw and wall
plug. Make sure to use a correct wall plug for the wall.
B) Attach the handle to the wall holder.
C) Connect the charging cable to the back side of the vacuum cleaner.
For all other models:
3 Assemble the charging stand.
4 A) Connect the charging cable to the charge stand.
B) There is a hollow space in the bottom of the charging station where
unused cable can be wound.
C) Position the charging station on a stable and horizontal surface away
from heat sources, direct sunlight or wet places.
5 Insert the adaptor into the mains and charge Ultrapower®. The charging
indicator will be lit when Ultrapower® is on charge.
CHARGING ULTRAPOWER®
6 When fully charged, the charging indicator will blink slowly. The num-
bers of LED lamps will indicate the level of charge. Full charging time is
around 5hours. For better battery performance, charge Ultrapower® for
24hours before rst use and always keep it on charge when not used.
VACUUMING WITH ULTRAPOWER®
Before vacuuming, check that the nozzle wheels and the brush roll are
clean from sharp objects in order to avoid scratching sensitive oors
and to ensure full cleaning performance.
7 Start and stop Ultrapower® by pushing the ON/OFF button. Ultrapow-
er® has 3 power settings which is regulated with the
power regulation
button
.
Ultrapower®
will start on the “High power mode”.
For more silent cleaning and longest run time, press the power regula-
tion button to activate the “Long runtime mode”.
Press the power regulation button one more time to activate the “Nor-
mal cleaning mode”.
BRUSHROLLCLEAN® FUNCTION
Use the BRUSHROLLCLEAN® function to keep the brush roll clean and
free from hair and bres. For best results use the BRUSHROLLCLEAN®
function when
Ultrapower®
is fully charged.
8 Place Ultrapower® on a hard and at surface. Do not use the BRUSH-
ROLLCLEAN
®
function on carpets.
Press the BRUSHROLLCLEAN
®
pedal with your foot while the cleaner is
on. Hold for 5 seconds until hairs and bres are removed. There will be
a cutting noise during this process, this is normal. If hairs remain on the
brush roll, repeat the process.
The BRUSHROLLCLEAN
®
function is equipped with an overheating
protection. If the BRUSHROLLCLEAN
®
function has been used for more
than 30 seconds (constant or interrupted) it will deactivate the brush
roll and turn o the nozzle front lights. The vacuum cleaner can still be
used, even when the BRUSHROLLCLEAN
®
function is deactivated. To re-
activate the BRUSHROLLCLEAN
®
function, place Ultrapower® on charge
and charge for 15minutes.
Please note that the BRUSHROLLCLEAN® function might not be able to
remove thicker threads or wires that are caught in the brush roll.
EMPTYING OF THE DUST CONTAINER
9 Remove the dust container by pressing the button.
10 Take out the lters from the dust container by pressing the release but-
tons.
Empty the contents into a dustbin. Never wash the dust container
or lters in a dishwasher.
IMPORTANT - FILTER CLEANING!
11 The lters must be cleaned at regular intervals to ensure a high clean-
ing performance.
Take out the lters by pressing the release buttons.
Separate the inner lter from the outer lter.
12 Rinse the lter parts carefully under lukewarm water without using any
detergents. (Never use the dishwasher or washing machine.) S
hake to
remove excess water and leave to dry minimum 12h before putting
them back into the cleaner.
CLEANING THE HOSE AND NOZZLE WHEELS
13 Loosen the hose behind the nozzle from its upper connection. Remove
any object or debris that can be blocking the airow in the hose or in
the air channel to the dust cup, and put the hose back.
14 If the wheels need to be cleaned or get jammed, remove them carefully
by using a at screwdriver.
REMOVING AND CLEANING THE BRUSH ROLL
15 If the brushroll gets blocked Ultrapower® will stop. Open the cable
protector grill and the brush roll hatch cover and remove the brush roll.
16 Us
e a pair of scissors to remove threads etc. Reassemble the brush roll,
making sure it can spin freely.
REMOVING THE BATTERIES FOR RECYCLING
Warning; Battery removal must only be done by an Electrolux
service center or ocial collection point!
17 Only remove batteries if the product is to be scrapped. Improper
handling of the batteries may be hazardous. Batteries should always
be completely discharged before removal.
Take your product to an
Electrolux service center or ocial collection point for recycling. They
can remove and recycle the battery and electric parts in a safe and pro-
fessional way
.
Follow your countrys rules for collection of rechargeable
batteries and electrical products.
Enjoy a great cleaning experience with Ultrapower®!
Завантажити посібник українською мовою (PDF, 2.72 MB)
(Бережіть природу: роздрукуйте цей посібник лише у випадку, коли це дійсно необхідно)

Loading…

Рейтинг

Дайте нам знати, що ви думаєте про Electrolux EUP86TBM Пилосос, залишивши рейтинг продукту. Хочете поділитися своїм досвідом щодо цього продукту або задати запитання? Будь ласка, залиште коментар внизу сторінки.
Ви задоволені Electrolux EUP86TBM Пилосос?
Так Ні
0%
100%
1 голос

Приєднуйтесь до розмови про цей продукт

Тут ви можете поділитися своєю думкою про Electrolux EUP86TBM Пилосос. Якщо у вас є питання, спочатку уважно прочитайте інструкцію. Запит на інструкцію можна зробити за допомогою нашої контактної форми.

Детальніше про цей посібник

Ми розуміємо, що добре мати паперовий посібник для вашого Electrolux EUP86TBM Пилосос. Ви завжди можете завантажити посібник з нашого сайту та роздрукувати самостійно. Якщо ви бажаєте отримати оригінальний посібник, радимо зв’язатися з Electrolux. Вони можуть надати оригінальний посібник. Шукаєте інструкцію до свого Electrolux EUP86TBM Пилосос іншою мовою? Виберіть потрібну мову на нашій домашній сторінці та знайдіть номер моделі, щоб дізнатися, чи є вона у нас.

Технічні характеристики

Бренд Electrolux
Модель EUP86TBM
Категорія Пилососи
Тип файлу PDF
Розмір файлу 2.72 MB

Усі посібники для Electrolux Пилососи
Більше посібників для Пилососи

Часті запитання про Electrolux EUP86TBM Пилосос

Наша служба підтримки шукає корисну інформацію про товар і відповідає на поширені запитання. Якщо ви знайдете неточність у наших запитаннях та відповідях, повідомте нас про це, скориставшись контактною формою.

Шланг мого пилососа засмічений, що я можу зробити? Підтверджено

Від'єднайте шланг і перегляньте його, щоб визначити, чи він насправді засмічений. У цьому випадку ви можете взяти довгий предмет, такий як мітла, і обережно просунути його через шланг. Це, як правило, видаляє будь-які предмети, що засмічують шланг. Якщо це не допомогло, зверніться до виробника.

Це було корисно (1464) Читати далі

Яких розмірів є пилозбірник? Підтверджено

Є два розміри, які потрібно враховувати. Перший - це розмір тарілки із входом в сумку. Це визначає, чи підійде мішок для пилу до певного пилососа. Тоді є розмір мішка. Це в основному вказується в літрах і визначає, скільки пилу може містити мішок.

Це було корисно (941) Читати далі

Я хочу знати вік мого приладу Electrolux. Як це зробити? Підтверджено

Ви можете визначити вік свого товару за допомогою серійного номера. Це можна знайти на вашому пристрої. Перший символ серійного номера вказує рік (тобто: 1 = 2001), а два символи після цього вказують тиждень виробництва (тобто: 35 = тиждень 35 цього року). Тож серійний номер 13500016 вказує на те, що машина з 35 тижня 2001 року.

Це було корисно (836) Читати далі

Шнур живлення мого пилососа не перемотується назад у пристрій, що я можу зробити? Підтверджено

Можливо, шнур має скручування або складку. Повністю розгорніть шнур кілька разів і перемотайте його назад у пристрій під керівництвом рук. Якщо це не вирішить проблему, можливо, механізм перемотування шнура порушений. У такому випадку зверніться до виробника або до сервісної служби.

Це було корисно (658) Читати далі

Мій пилосос видає свист, що я можу зробити? Підтверджено

Цю проблему часто спричиняє повний мішок для сміття або фільтр або отвір, який пропускає повітря в шланг. Перевірте пилозбірник та фільтр та за потреби замініть їх. Перевірте шланг на наявність отворів або пошкоджених з'єднань. Якщо це не допомогло вирішити проблему, зверніться до виробника.

Це було корисно (551) Читати далі

Як видалити пил і волосся з головки щітки пилососа? Підтверджено

Видалення пилу та волосся з головки щітки пилососа проводилося вручну. Якщо це не вдається за бажанням, можна скористатися тонкою гребінцем для видалення залишків бруду.

Це було корисно (536) Читати далі

Яке налаштування на головці щітки пилососа слід використовувати? Підтверджено

Майже всі пилососи мають головку з регульованою щіткою. Використовуйте щітку для твердих поверхонь, щоб запобігти подряпинам та пошкодженням. Вимкніть щітку для килимових покриттів і килимів.

Це було корисно (419) Читати далі

Чи можу я користуватися паперовим мішком для пилу більше одного разу? Підтверджено

Це недоцільно. Пори сумки будуть насичуватися, спричиняючи втрату всмоктування та, можливо, пошкодження двигуна.

Це було корисно (286) Читати далі

Що таке HEPA? Підтверджено

HEPA розшифровується як високоефективне тверде повітря. Багато пилососів мають HEPA-фільтр. HEPA-фільтр зупинить щонайменше 85% і не більше 99,999995% усіх частинок 0,3 мікрометра (мкм) і вище.

Це було корисно (259) Читати далі

Чи можу я використовувати звичайний пилосос для всмоктування попелу? Підтверджено

Ні, це абсолютно неможливо. Попіл, який здається охолодженим, все ще може бути теплим або навіть гарячим всередині. Звичайний пилосос для цього не призначений і може спричинити пожежу. Крім того, фільтри звичайних пилососів не завжди підходять для утримання надзвичайно дрібних частинок, таких як зола. Потім він може дійти до двигуна пилососа та спричинити пошкодження.

Це було корисно (251) Читати далі
Посібник Electrolux EUP86TBM Пилосос

Супутні товари

Пов'язані категорії